Monday, December 19, 2011

Easy Co Worker Christmas Gifts

I have been making a ton of little hot chocolate gifts for myself, my mom and mother in law to give as gifts. It was so fun, I think I might have gotten a bit carried away! But that's ok, who doesn't love chocolate on a spoon!!


These chocolate spoon were so easy to make. Just pour a little chocolate into the spoon, add your candy decoration and let them harden! I found that the spoon needed to be elevated a bit on the end to dry the best, so I used scrabble tiles, because they were right there, I also used a plate upside down, and that worked out well too. I found m&m's worked well, candy canes crumbled also worked well. I crumbled up candy cane hersey kisses and those melted into the chocolate, so I didn't use them on many.


More spoons with the plate support...


I was also a marshmallow dipping fool!


Yum! Lot's of chocolate dipped Marshmallows!!


The finished product. I made two versions! The first had 4 packets of coco in it. We used Nestle and I liked how it said "Warming Chocolate Moments" on the front of it. That added a nice touch. Four spoons, several marshmallows covered in chocolate and a small bottle of Bailey's!!

These were packaged in a small red box and turned out great!


The smaller individual serving gift included one pack of hot chocolate mix, one spoon, and two marshmallows. I love how these turned out!


Sunday, December 18, 2011

My first Silhouette Project!!!


Last week I promised my finished first silhouette project. It was so much more difficult than I thought it would be. I follow lots of bloggers who frequently post about their Silhouette so I thought it would be easy and fast to use. While I do still really like my Cameo, it just is a lot harder to use than I thoguht it would be!

So I cut on vinly the saying "Have yourself a merry little Christmas" to paint onto a canvas board. This part was the most fustrating part, but I finally was able to cut the saying out of a couple cutting sessions...

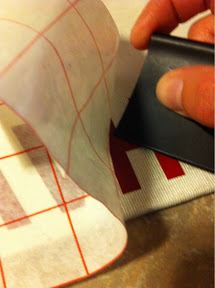
I transfered the vinyl onto the transfer paper. This part seemed easy enough...


And the vinyl did stay attached to the transfer paper!


Rubbing it back onto my surface was a bit harder than I thought it would be. I had to use the tool to hold the vinyl onto the canvas board to get it to stay down as I pulled the transfer paper back.


After the very slow process, I was finally able to align all of the letters onto the canvas board. It looks so pretty like this, I maybe should have just left it like this!!


I made two copies of this canvas. The second time I used the white back ground paint to paint over the letters first to try and take care of any seepage... it didn't help.... and actally worked better on my first version... of well! I used Martha Stewart paints and the sponge brush.


Loving the first part of the canvas!


Onto the second part!


Red glitter paint for the word "little" from the Martha Stewart line. The glitter paint was a little hard to paint over the green paint, but the sponge seemed to help, and after 3 coats we had a nice finished product.


The finished product!! I am very happy with how it turned out! I thought it would be easier than it really was, but I can't wait for my next project.

Wednesday, December 14, 2011

Cutting Vinyl with the Silhouette Cameo

I was so excited, I ordered my very first cutting machine on Black Friday from Silhouette. I got the Cameo at a nice discounted Black Friday price! I was so excited for it to arrive because of all of the fabulous projects I saw out in blogland that I could not wait to try!!

Once it arrived I was sort of at a stand still, what would be my first project?? So many things to make, so little time, and to be honest the machine was a bit intimidating! And I am a crafty (previously worked for a major Crafting company), creative AND computer literate person! (I have a minor in Computer Science - little known, un-shared, nerdy fact about me!!)

I have now used my Silhouette Cameo a few times, so I am by no means an expert, and I still have no clue what would be a GOOD first timer project... Maybe printing some nice Holiday gift tags or something nice and easy with cardstock, because the manual you get with your Cameo does a nice job of explaining how to cut with cardstock. But I decided my first project would be to make a canvas vinyl board, because lets be honest that's why you get the Silhouette Cameo or any cutting machine in the first place!!!

I decided with help from my sister to make a board with the saying "Have yourself a Merry Little Christmas". I designed it in Silhouette Studio (the easy part, and again pretty detailed in the start up manual information.

Then came the hard part, cutting the vinyl. I think I now have it all figured out, but it took WAY too much time, that I don't have with a toddler running around the house!

Setting up the Silhouette
First a huge step I missed for the longest time: Adjusting the Rollers for Smaller Media. I figured I was cutting 12" vinyl, I did not have to do any adjusting, but yes you do. The machine comes set up for cutting 13" to adjust for the extra inch on the cutting mat! So refer to page 8 of the Getting started with your silhouette Cameo to see how to do this.


Loading the vinyl takes a bit of adjusting because I always seem to get it bunched up a bit, so I have found starting with a straight cut helps. Line the vinyl up to the rollers and on your control panel of your Cameo use the arrow to select down to Load Media. Then hit the enter key on your Cameo. Make sure the vinyl is straight within the rollers as well.


Then follow the directions on cutting with your machine within the silhouette studio and HOPEFULLY it should cut your vinyl! Make sure to un-select cutting mat so it adjusts for the lack of thickness of the cutting mat. It says to use a blade thickness of 1, but I found 2 works better. I was having trouble with my blade not cutting well so maybe now that the new one is broken in a bit I will switch it back to 1 to see if it still works well.

Even after I thought I had this all figured out it still doesn't work perfectly. I was cutting a longer saying, and half way through it just stopped cutting it. I am not sure why but I finally got my saying cut after a few tries.

In my several communications to Silhouette I suggested they revise their printed materials that are included with the machine. So hopefully they listen to my suggestion, because this was really frustrating to figure out! They were very helpful, but I feel that if I am trying to do something that my product is advertised to do and I need to call the help line to figure out how to do it, there is a problem.

Like I said not an expert, and maybe I should have become an expert on cutting paper before trying vinyl... I cringe to think about how much fun cutting fabric or other different media is going to be!! But hopefully this can help someone else not waste and entire new role of vinyl trying to figure this out!!!

I am still working on the finishing touches of my first Silhouette Cameo project and will post it when it is finished!

Was this helpful, did I miss something important?

A FEW MORE THINGS - Added Feb. 1
So I have had my Cameo for 2 months now, and I am still by no means an expert!! I still have had times where I completely messed up my project using vinyl.

A few things I have learned:
  1. Go and buy some contact paper from the store. I bought a clear roll from Target for something like 5 bucks. I just recently did this, and should have a while ago since so far I have only used vinyl as a stencil and throw it away. The contact paper has worked just as well and is much cheaper!! NOTE: make sure to put the right side up when you cut it, I didn't the first time and had to do another round of cutting! Opps...
  2. Buy Freezer Paper! I still have not done this, but its supposed to work really well as a stencil on fabric! I have used vinyl on fabric before. The first time it worked REALLY well. The second time not so well... Google the Freezer Paper idea and check it out. AGAIN a money saver and you are not wasting your expensive vinyl.
  3. Don't try and cut a "skinny" font! I tried to cut a very fancy, scroll font and it tore the entire thing. Maybe there is a way to cut a thin scroll font with vinyl... but I have yet to figure that out... and again wasted some precious vinyl!
  4. Smaller sections work better than one large section. Pretty self explanatory!
  5. Sometimes the transfer paper just doesn't help!! I am starting to find that if you are using the vinyl as a stencil it almost works better to not use the transfer paper and to just lift the vinyl from the backing and re-position it by hand on your background. Be careful not too stick the pieces together... and again the smaller sections work better.
That's all I have for now.... here's to fabulous projects with the Silhouette Cameo!

See all of the projects I have made using my Silhouette Cameo here. 

Tuesday, December 13, 2011

Silhouette of Little Man

For Christmas, I thought a nice silhouette picture of Little Man would be a nice gift idea for the Grandmas. It was very simple to make and took very little time.

This is the picture I started out with. I wanted something that showed his cute little cheeks!

I used Photoshop CS5 and I am by no means an expert and it still took me only a few minutes. I first used the Quick Selection Tool and ran it around his head to select his head. I made sure to select more than less of his head (It's easier to remove by hand later than add more in I think). Once this was done, I selected the inverse (Select - Inverse) and deleted the background image. Then I used the eraser tool to remove any extra background and to straighten some of the lines out.

Once I had his head selected, I simply changed the Exposure (Image - Adjustment - Exposure) to -20, which turns the entire image black. If you are not happy with the image at this point you can undo if needed and follow the above to get the shape you want!

Here is the finished JPG silhouette of Little Man!
To cut it using my Silhouette Cameo, I saved my image as a JPG and opened it in Silhouette studio. In the trace menu, I selected my entire image with "select trace area" and then selected "trace outer edge." I then had a nice image of Little Man ready to be cut out.

I used black card stock to cut my image and mounted it on some more card stock for framing. The perfect gift for Grandma!

I need to add his name and the date yet as well.

I remember when I was a kid a teacher tracing our image onto paper with an overhead projector and having to cut out the image ourselves... my times have changed! This project took me less than 30 minutes to complete!

Children's Jewelry Frame


A few weeks my 6 year old niece was over and was very interested in my DIY jewelry storage I made for myself and since she is very into the "I want to be a big girl" I thought I could make her own jewelry storage for Christmas.

I found this awesome white and pink frame at Good Will, even though it was on the expensive side for Good Will, I knew it would be a perfect frame for this project! It started a little too pink for my big girl niece, so I painted the frame a nice sky blue.


I made my niece a french memory board for her birthday at that point she said her favorite colors were blue, purple and pink in that order, so I used blue and purple on her memory board. I had some left over purple fabric left from that project so I used that on this one. I wanted a little more design to it, so I used Martha Stewart craft paint for the first time on fabric. (I was spray painting before this picture was taken, and made a mess on my hand!)


The fabric paint looks a little taupe but it's actually a dark gray.


To get the placement of my silver metal hooks, I screwed them in on the backside onto a grid I drew on the cardboard. This helped me get them centered and in the right place!


With the hooks still on the wrong side, I hot glued my new fabric onto the board. Once on, I poked the hooks through the new fabric and switched them to the right side. It made my life much easier! Then I added some felt to the back and we are done!

I love this frame! And I hope my niece likes it too!

Monday, December 12, 2011

Ugly Christmas Sweaters!

Last weekend we went to an ugly Christmas Sweater Party!

This was my uncle and the winner of the ugly sweater party! He won a traveling ax trophy.
My dad and his 3D tree ugly sweater!! My mom took a wall hanging and attached it to his sweater along with several small sweaters that spelled out "Christmas"
The lovely ugly sweater my sister made for her husband (I helped!!) This won an ugly sweater contest the weekend before!! Notice the short sleeves with the nice gold trim!!
This was my ugly sweater! Hot glue made this possible! It's a bit hard to tell from this picture, but mine had Christmas lights that flickered! And lots of bells! I was a little disappointed, I thought I would get a vote, but I didn't!

A group shot of the ugly sweaters! Aren't we all pretty in our ugly sweaters!! Little Man had an "ugly" sweater that I bought at Good Will that was a nice train sweater vest, but he was so excited by it, I felt bad making it into an ugly sweater, so he is wearing Santa Jammies!

Linked up to an Ugly Christmas Sweater Shindig


Tuesday, December 6, 2011

Easy Christmas Art Work

When preparing for my guests I had this morning, last night this empty frame was driving me nuts! So I created some easy 5 minute art! It really only took me 5 minutes!

My frame before. Empty!

I taped red fabric to the back of the mat, then put the frame back together.


When I made my Christmas pillows a few weeks back, I knew how much I hated using the iron, so I prepared a few extra trees using the Wonder Under product, so I have a bunch of fabric trees with the paper backing on them. I used basic tape runner and glued the trees to the outside of my glass frame.

And we have a super easy Christmas decoration. And all of it can be re-used in the future since I only used tape! The flash on my camera emphasized the creases in my fabric, but they are not that noticeable on the wall.... like I said, I don't like to iron.... but that would be an easy fix!