Showing posts with label stencil. Show all posts

Saturday, May 23, 2015

Using Your Silhouette Cameo Vinyl on Stained Artwork

In a few days I will be sharing my Industrial basement playroom. When I had the room mostly complete, I realized it needed one more thing. 

I had a lot of 12x24 in boards laying around, So I decided to stain one, and create some fabulous artwork for the playroom. 

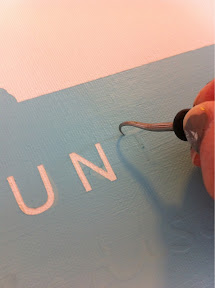
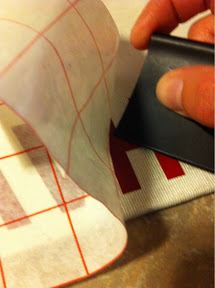
I love the contrast between stained wood and paint, so decided to bring out my Silhouette Cameo and create a fun playroom appropriate saying. 


I quickly quickly realized applying vinyl from a Silhouette is nearly impossible on stained wood if you do not spend a lot of time wiping extra stain from your board, which I never did!!! So this was a much harder project than it needed to be!! (Doesn't it always seem to be like that, something that should be simple always finds a way to be extra difficult.)

I love my finished result. I think it looks great in my industrial playroom!! And now I know how to stain a board and use vinyl from your silhouette!!

See more of my projects using stencils I made with my Cameo.

See more of my projects using my Cameo.

Thursday, May 14, 2015

DIY Railroad Crossing Sign

Last week I revealed my son's train bedroom. If I did't say it enough in my reveal post, I LOVE this room. Love it!!!! I would not change a thing (ok I would add a headboard..... which I never got around too... )

One of my favorite pieces in his room is this large railroad crossing sign.

When I started planning for his room I knew I wanted this sign to be a feature. I just was not sure how I was going to create or find it!

After a lot of thought on how to cheaply get a big circle piece of wood, I decided to search for one of those 3 legged wooden round decorative side tables! I asked around with family because someone had to have one of these tables laying around!!! My aunt did and the legs were broken so it was a great free win for me!!!!

A little bit of painting tape, some "R" stencils (I made mine with my Silhouette) and some yellow and black paint and I had a free large railroad crossing sign!!

If you need more information on stenciling, visit my other stencil projects!

Wednesday, January 23, 2013

Train Artwork

I have slowly showed bits and pieces of Little Man's new Big Boy room. Well today I have some simple artwork I made for his book shelves. I downloaded the shape from the Silhouette website. 


Little Man loves to say "All a board" so it was an easy addition to add to the sign!


This was so easy to make!! Check out the other stencils I have made with my Silhouette Cameo for tutorials on how I made this! 

Sunday, December 9, 2012

Christmas Subway Art


I love the Subway Art I made for my living room.  As I was recently admiring it, I thought I should figure out where I bought that board so I could make another one in that size since I like the size!! It's a 12 x 24 inch board. Well...... a light bulb went off..... why not just use the back side of the board, then I don't have to store either when its not in use!!!!

SO here is my new Christmas Subway art. It works for this year, but I created my file in Silhouette Studio on my laptop using the same font I used on my black one and sent it to myself to cut out on my desktop.... and SOMEHOW the font changed!!!!! I didn't realize until I had the entire thing cut out and placed on the board... so I had extra space.... so its not as perfect as I would like it to be.... it meant I had to done some piecing together and some of the lines are not straight :) Has anyone else every had this problem???

Maybe if I am bored in the next couple weeks or next year I will re-do it!!! But just think of all of that vinyl I would waste and it works for now!!!

Saturday, August 11, 2012

More Subway Art

I finally made myself some Subway art, after making it for everyone else!!

I used a 12x24in piece of plywood for mine and pretty much followed my previous post Subway Art Sans the Silhouette except this time I did use the Silhouette!

I learned a few lessons on this. I designed my 12x24 inch file in the Silhouette studio software which was fine but its kind of hard dealing with that large of a piece of vinyl! I used transfer tape (not the transfer paper) for the first time. Did you  know there was transfer paper and transfer tape? I kind of like the transfer tape better, its basically a large roll of masking tape. So again dealing with a 12x24inch piece of transfer tape was a lot of tape to deal with. I placed the entire 12x24inch piece at one time and then ripped the transfer tape row by row only removing one row at a time. The whole thing took a lot more time that I thought BUT it worked out perfect!

The vinyl was perfectly straight!!!

  AND I used the trick of painting a layer of your base coat over the vinyl before using your top coat (in my case white) I really do think it helps! AND I have one letter that up close was not 100% perfect!
I am so happy with how it turned out! I love its "odd" size! I decided not to distress it. I might still go back and do that. I was just so happy with how it turned out I didn't want to go back and play with it any more!!

Friday, April 20, 2012

Burlap Wedding Shower

 Last weekend we hosted my sister's wedding shower. Since my sister wanted a joint shower with both sides of her future family we decided to have it at a restaurant! After the insane April we have had, it was a great decision! My youngest sister put together this cute towel wedding cake display for our sister. We used burlap circles to decorate the "cake" and a rhinestone hair pin on the top for a little extra bling.

 Since we used burlap on the invites (and I am sort of obsessed with it at the moment) I made a burlap banner. ( I wish I would have hung this a bit higher, but oh well it still looks cute!!)
This was so simple to make. I simply cut out 4 - 5.5 x 5 inch burlap squares. I then made a stencil with my Silhouette (you could easily buy something, or free hand if you like) and used my trusty black acrylic paint to fill in my stencil. Once dried I used my sewing machine to sew the squares together onto a piece of jute. So simple and so cute!!!
 Then I made the Bride and Groom initial canvas artwork for them to use as they wish! I found these great linen canvases at a local craft store. I LOVE the color and love how they are not white but already have that great linen texture!! (I bought 4 more for myself for TBD projects!!! I love them THAT much!!!)

I again used my Silhouette to create a stencil for the letters. (Again you could use other options to achieve this looks!) Again used my acrylic black paint (that's what the label said!!) and created this cute simple artwork!

The last project I created for this shower was the favor. You can't have a shower without a favor!!! I ran to Home Depot and picked up a few packages of Gladiolas bulbs. We then cut and wrapped them in burlap. (See how to cut burlap)  I used a stamp set to stamp the phrase "Let love grow" onto a piece of card stock and included basic planting directions (we didn't want anyone to think it was something to eat.....) and there we have a simple but cute favor to match our burlap themed wedding shower!
The best part about using Gladiolas bulbs is this was my grandpa's favorite flowers. He used to grow these flowers and they really remind me of him!

The whole look!!!

Monday, March 12, 2012

Runners Award Display Board

I've already had one of my three sister's as a guest poster on my blog. Today I have my youngest sister's project to share!

She recently ran a half marathon and a full marathon and has run several shorter races. Being that it is an accomplishment to run a marathon she decided she wanted a way to display her race bibs and her awards.

She searched around Etsy and other places for something to display them and could not find anything. So she made her own!

I am not really going to go into the details on how she made it. She followed the directions of the Subway Art Sans the Silhouette post I posted in January (my other sister's creation!)

She started with a white base coat and added her saying.

She spray painted a couple coats of black. Removed the word Run and distressed the board.
She added 4 hardware metal hooks on the front for the bibs and medals. It is also important to note that you need to hang TWO hanging hooks on the back or it will not hang right!


Thanks again to my sister for sharing her project!!! I love that I have creative sisters!!

My entry into Show Me Extraordinary sponsored by Appliances Online and Bosch Washing Machines.

Tuesday, February 7, 2012

No more stencils on the floor...

This may not be a brilliant discovery, but my large stencils were driving me INSANE! I did not know where to store them, my smaller stencils I store in a magazine rack, but I have a few that are WAY too large... last night I had the brilliant idea to hang 3 command adhesive hooks behind more door and hang my stencils...
They fit perfect!!


YEAH! No more large stencils taking up valuable floor space in my INSANELY messy craft room... Just open the door all the way and they disappear! Like I said... brilliant or not brilliant I am not sure, but anything to organize a bit is always an awesome thing! And it again goes to remind you to use those random places you sometimes forget about!

Friday, January 13, 2012

Red Envelope Knock-off Artwork

I love Red Envelope for their unique gifts. I have bought and received my share of things from Red Envelope but recently when exploring their website I came across their personalized canvas art work starting at $120. While I would have no problem purchasing a personalized canvas for that price but these are SO simple looking that I figured I could easily make them myself for a fraction of the price.

I LOVED the state canvas! So cool! But so easy to make! (For some reason this was really hard to photograph - the state looks pink.... it's not, it's white!!!)
I used my Silhouette Cameo to make state of Wisconsin and the text.

I searched the internet for a state of Wisconsin image and I found a pretty simple one. If you can't find a simple shape you can use the directions I used for making a silhouette of my son in photoshop.

To cut the state shape with the Silhouette, I saved my image as a JPG and opened it in Silhouette studio. In the trace menu I selected my entire image with the "select trace area" and then selected "trace outer edge." I then re-sized mine to be about 12x12 since I was using a 16x20inch canvas. Then it was off to the cutting machine!
I then transferred the state and words to the canvas.

I then piled on the white paint to try and seal the vinyl to the canvas. I actually did two light coats and it did NOT bled.
I then painted several layers of Martha Stewart's Surf craft paint.
I did let it dry over night so it was good and dry. I know some remove the vinyl when wet, but I figured it would be easier to remove the large state image when dry since its so large! I was so nervous pealing the letters off!
But it turned out GREAT! I love it! I love the detail that the Silhouette cut out for the state border!
I think it turned out great! Here is the original from Red Envelope for $120!
While browsing the Red Envelope site I came across this pretty canvas that will go well in my guest bedroom! Again $120!
Well here is my version. So simple I just used my Silhouette again. And this canvas I have had for about 5 years and re-painted over it the dark gray not knowing what I would use it for! So this was a pretty near free project for me! This canvas is about 15x30 inches and I love how large the canvas is and how there is so much extra space on the top and bottom!

Wednesday, December 21, 2011

Childs Chalkboard Frame

Last week I showed the gift I made for my 6 year old niece, this week I am showing the gift I made for her younger sister, our 3 year old niece. I also found this frame at Good Will, and of course I did not take a before picture, but it was in bad shape! I spray painted the frame gray, and used my Rust-o-leum chalk board paint in teal to paint the background board. Since this is for a 3 year old girl, I trimmed the outline of the frame in pink, because what 3 year old does not love pink! I then used my Silhouette to stencil her name on the bottom of the frame!


Used my Martha Stewart stencils to add some blue flowers and one beautiful blue butterfly!


I attached the background to the frame, added felt to the back and was done! I decided not to add any hanging hardware because I am not sure how she will want to use it!

When I was photoing the finished product, my little man decided he needed to write Merry Christmas on the board as well! He was having lots of fun drawing on it, so I hope our niece will like it just as much!

Sunday, December 18, 2011

My first Silhouette Project!!!


Last week I promised my finished first silhouette project. It was so much more difficult than I thought it would be. I follow lots of bloggers who frequently post about their Silhouette so I thought it would be easy and fast to use. While I do still really like my Cameo, it just is a lot harder to use than I thoguht it would be!

So I cut on vinly the saying "Have yourself a merry little Christmas" to paint onto a canvas board. This part was the most fustrating part, but I finally was able to cut the saying out of a couple cutting sessions...

I transfered the vinyl onto the transfer paper. This part seemed easy enough...


And the vinyl did stay attached to the transfer paper!


Rubbing it back onto my surface was a bit harder than I thought it would be. I had to use the tool to hold the vinyl onto the canvas board to get it to stay down as I pulled the transfer paper back.


After the very slow process, I was finally able to align all of the letters onto the canvas board. It looks so pretty like this, I maybe should have just left it like this!!


I made two copies of this canvas. The second time I used the white back ground paint to paint over the letters first to try and take care of any seepage... it didn't help.... and actally worked better on my first version... of well! I used Martha Stewart paints and the sponge brush.


Loving the first part of the canvas!


Onto the second part!


Red glitter paint for the word "little" from the Martha Stewart line. The glitter paint was a little hard to paint over the green paint, but the sponge seemed to help, and after 3 coats we had a nice finished product.


The finished product!! I am very happy with how it turned out! I thought it would be easier than it really was, but I can't wait for my next project.