Friday, February 26, 2016

Simple Red Minnie Mouse Birthday Party

A couple weeks back I posted about my daughter's 3rd birthday, and realized I never shared her big 2nd Birthday Party. At the time this little girl was OBSESSED with Minnie and Mickey Mouse. So it was a VERY easy decision on what type of party she would have. But since she had an over the top PINK 1st Birthday, I decided on a red Minnie Mouse party.  I love the look of the primary colors in the red Minnie Mouse - and made for some easy party decorations!

The cupcakes were so simple. I ordered a couple dozens from Target and had them frost them in red and white.
                                                 
Mini Oreo's and little bows made some EASY Super cute Minnie Mouse cupcakes.
A few days before her party she decided she wanted a Goofy cupcake. I added little figurines to some of the cupcakes, so she got her Goofy cupcake!

As I have done for all of her birthday parties, we had a Hot Chocolate Bar. A must in February! 
I made all of the Mickey silhouettes with my Silhouette.
No party is complete without a Happy Birthday Banner! 
 The food with a Minnie Mouse Birthday party could not be any easier!!! A HOT BOG Bar of course! Check out my tips for a hot dog bar with a free printable!
Hot dog topping suggestions!
 Some simple table decor for the kids table!
And there you have a simple red Minnie Mouse Birthday Party!!! 

Wednesday, February 24, 2016

Handmade Headbands and Banner Pendants

A while back I toyed with opening an Etsy shop and putting my sewing to use. I have finally created a Facebook page for some of my sewing projects. Check out my new Facebook page: Ange Sew Simple

Sample banners!

I also created some headbands for a local photographer, so I made a few extra. These make great newborn photography props! They are adorable on!

Thanks for visiting, stop over to my Facebook page and like Ange Sew Simple for new items!

Saturday, February 20, 2016

2016 is My Year

2015 was a great year! We sold our house, lived with my parents for a few months while we built a new house, and moved into our brand new house! As you can imagine it was a crazy busy year! But it was great.

2016 is going to be my year! A year I focus on myself for once. I've already had my birthday for 2016, and I am getting so close to a crazy big number, so it's time to focus on me!


Just planning on doing a few simple things!!
1. Eat healthier
2. Move more
3. Drink more water
4. Do something for myself at least once every other week
5. Get organized

Wednesday, February 17, 2016

Organized Hall Closet

One of the last things you tackle when moving into a new house is the closets! People usually don't randomly look into them, so why bother. Well I finally tackled my upstairs hall closet. My before..... 


This is a fairly nice sized hall closet, well at least compared to the last two hall closets we have had! I showed the hall closet from our last house here. While it was much longer, it was SO shallow. You could barely put a bin in it because of it being shallow and with the supports.

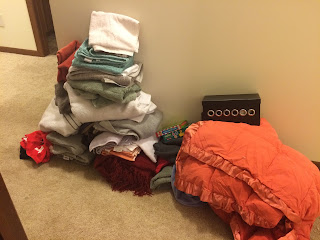
Look at all of the stuff I took out of there!! This is a massive pile of stuff we don't need. For some reason I had 25 pillow cases and about 10 unneeded and crappy bath towels! I also moved all of the kids towels into their bathroom in an empty cabinet.


And the after!!!! AHHH so much prettier and so much more organized!!! AND I have so much more space for additional organized bins and what nots!! 
 It's amazing how much prettier a space looks when its not over crowded and with pretty bins!!!


Tuesday, February 16, 2016

Industrial Laundry Room Make Over

I give you my new and fabulous Laundry Room!!! 

I am so excited about this room!!! First off, in my past two houses, our laundry room has always been way down in the unfinished part of the basement. I hated carrying big laundry baskets down two full flights of stairs just to do laundry. So when we built our house, I was so excited for our laundry room to be upstairs on the same floor as our bedrooms!!!! This has made my life so much easier!

I give you my before, this is what it looked like when we moved in. "Standard" according to the builder would have been a wire shelf across the wall, I asked the builder to not add that, which gave us a nice little credit and a blank space to work with.
 I thought and procrastinated about this space for a long time. Cabinets would have been nice, but cost money. As you may remember last year I made Industrial Shelves for our basement using galvanized pipes. I was not completely happy with how my shelves turned out, and we currently have an unfinished, chaotic basement. So I decided to tear apart my Industrial shelves and hang them up for FREE laundry room shelves!!!! (Free because I already had the stuff!!)

I was so NERVOUS about attempting this project. It would either turn out AMAZING or be a huge huge fail.
It was actually fairly simple project once I got the nerve to do it!!

I used

  • 8 floor flanges which I had previously spray painted bronze
  • 8 - 12 in pipes which I had previously spray painted bronze
  • 6 foot board which I previously stained
  • screw
  • level
  • drill and screw driver
Assembly is easy, find a stud (each floor flange has at least 2 screws into a stud) and attach the floor flange to the wall, and then screw in a pipe. Using a level repeat until you are done!!! See, so easy, why was I nervous about this project????


It is amazing how much different this room looks now!
I am so glad I tore apart my shelves that I wasn't feeling and created something I love and is VERY useful!!
 I love this photo! It was taken by my grandma :)


The laundry room is right between my kids bedrooms, so a lot of times they just throw their dirty laundry right into the washing machine!  And I love that I have a window!! It is such a fun place to do laundry, and so convenient that I do at least one load of laundry a day!!

Friday, February 12, 2016

Best Adhesive for DIY Wedding Pocket Invitations

I can't believe my youngest sister is getting married in a couple months!!! I have three sisters and this is the last of my sisters to get married!! While it is a very very exciting time, its also a little sad its the last of my sister's weddings! Because sister's weddings are so much fun!!! 

A few weeks ago my sisters and mom got together to assemble the awesome invites my sister designed for her wedding. Aren't the cute! Her colors are navy and gold!! (Two colors I myself am currently obsessed with!!) 

 When preparing for our get together we questioned what was the best adhesive to make pocket wedding invitations. We tried a couple different options but decided adhesive dots where the best solution! They were easy to assemble and created a secure pocket!  
 The dots work perfect for adding the invitation to the front of the pocket invite.
And stretching a glue dot the entire length of the pocket holds the pocket perfectly in place. It is narrow enough that the contents of the pocket fit in perfectly.  It also creates a secure pocket so your contents stay in place!!
I just got my invitation in the mail and it looks perfect! I can't wait for her wedding and I am sure you will see more of it as her wedding gets closer! 

Saturday, February 6, 2016

Frozen Inspired Birthday Party

I blinked, and now my little girl is suddenly 3! I am not sure how this happened! 

Well like most little girls, my little girl is Frozen obsessed! So when it came time to pick out a theme for her party she picked Frozen! With a February birthday, a winter theme is the perfect theme! As you may remember she had a Pink and Gold Winter Wonderland party

I love the sweets table! I love creating food for the sweets table! I made both chocolate covered Oreo's and Cake Pops.

What frozen party is complete without ice skates! My almost 6 year old son plays hockey, so of course my daughter wanting to be exactly like her big brother can't wait to play hockey. She just started skating lessons and loves them!
Her own mini cake! She was very excited about her little cake!


Her Happy Birthday Banner! For some reason this looks great in person, but did not photo well!!

I LOVE this tulle table skirt! It is amazing! I was tempted to make an adult sized tutu instead of the table skirt, but decided my original plan was best!

After the sweets table, I love putting together the kids table! The kids always find it fun to drink out of the special glass milk jars!
I made wands for each of the kids! They were so easy to make! And the kids loved them!

While making the tutu table skirt, my son thought it would be awesome on the back of a chair, so I dazzled up the birthday girl's chair!
 What Frozen winter party is complete without a hot chocolate bar!!!!
For toppings we had caramel bits, mint candies, white chocolate chips, marshmallows, chocolate covered marshmallows and chocolate spoon stir sticks.
Did you guess we were having a Frozen party when I gave tips on making chocolate covered marhsmallows and chocolate stir spoons?

And finally I give you a picture of the birthday girl and two of her cousins!!!! I can't believe this girl is 3! It has gone so fast! She is an amazing and wonderful little girl!