Showing posts with label about me. Show all posts

Tuesday, September 9, 2014

Selling Our House

We are hoping to put our house on the market in late winter / early spring to try and be in a new home before our son starts Kindergarten next fall. Which made me realize that we needed to get any outdoor projects done now, or else it might be covered in snow when it does come time to sell!!! 

Outside home selling prep work is sort of boring!!! I spent a good ten hours outside this past weekend and you really can't tell I did anything at all. 

Here is my before - well my mid project picture. I did remove our old and broke storm door!!!! 


 Here is the after! Besides the kid chair, pillow and flowers you can't really tell what took me so long!! And that's because I painted the columns and the trim around the door. I also painted the trim around the garage door. Don't get me wrong, this was necessary for selling our house and it looks 10000% times better in person, but its not really that noticeable!


Next weekend I have to stain the deck and I would really like to paint the front door. After that we should be ok on our outdoor projects! About that door - I am having the hardest time picking out a color to paint it!!! I am not painting our red shutters so that sort of limits the colors. While at Home Depot I grabbed every swatch I could find in red.... but I am thinking navy, black, white, or yellow.... who knows, I can't decide!!!

This is the second home we have sold. Our first home we sold by ourselves in 2008 in 5 days. So of course I am hoping this will sell as quickly!! It won't be as easy as when it was just my husband and I and we always had a clean house.... some how these two fabulous kids have WAY WAY too many toys and always have a mess going!!!

Seriously, what color should I paint my door?

Tuesday, May 28, 2013

My little girl

Wow I have not blogged a lot this year! But I have been pretty busy and not had a lot of chances to be crafty or creative! My very good reason is in February I had my second child, a sweet little girl name Ava! She is such a great little baby and her big brother loves her dearly. He is already so protective of her and she loves watching her big brother!!!
 
I am finally getting used to being a mommy of two, and have some free time during the day, that I can find time to be creative!!! So I thought I would introduce my little girl to the blog and I will hopefully start blogging again!!!
 

Wednesday, January 2, 2013

Tuesday, January 1, 2013

My To-Do List

Updated on 1/1/13
While I didn't actually finish 100% of the things on my to-do list I actually did pretty good on it!!

Little Man is in his new big boy room, though he still isn't GREAT about sleeping in his room. The room is not 100% done, I need to put stuff on the walls still, but it will be done soon, hopefully, and if its not done for a few months its still ok! Is any project really ever done?

The guest room / office still needs some organization and needs to be cuteified! But its getting there!

I finally figured out how to backup my millions of photos. AND I actually did it!!!

I still REALLY need to make a photo book of Little Man from March 2011 before the end of January. I am going to do this!!!!

I have a whole NEW to-do list that's not overly crafty that I need to complete by the end of the month. We are having a baby hopefully no later than the first week of February so I have a lot of laundry, bottle sterilizing, and baby gear cleaning to do!!!

My to-do list for the rest of 2012

Photos
1. Create a photo book for February 2011 for my son
2. Create a photo book for March 2011 for my son I HAVE HAVE HAVE to finish this by January!!!
3. Create a photo book for my son's first birthday
4. Create a photo book for rest of 2011 (maybe 2)
5. Create a photo book for little man's 2nd birthday
6. Figure out backup storage for photos DONE
7. Review / Delete extra photos (this could take years to go through my thousands of pictures....)

Kitchen / Dinning Room DONE
8. Add some color to the kitchen
9. New art work in the dinning room 
10. New curtains for dinning room 

Main Floor Bathroom DONE
11. Paint main floor bathroom Not happening in 2012!!
12. Hang new shelves in main floor bathroom Not happening in 2012!!

Living Room DONE
13. Paint living room
14. Paint living room accent wall Not happening in 2012!!
15. Furniture for living room This might happen in 2015!!! :) If I am lucky. Not going to happen in 2012!
16. New curtains for living room 

Master Bedroom DONE
17. Paint master bath vanity - I have decided this will MAYBE be added to 2013's to do list!
18. Add more style to master bedroom Adding the dresser has done it for me for now!!
19. Lampshades master bedroom I have decided for now to leave them as is.....
20. Dresser in master bedroom 
21. Organize master closet Thanks nesting!!! :)
21.5 Spray paint mirrors They are staying as is for now.....

Little Man's Big Boy Room DONE
22. Convert craft room into little man's big boy room
22.1 Organize craft room
22.1 Remove clutter from craft room
22.3 Empty craft room 
22.4 Sell, Sell, Sell, Sell.... lots of extra crap in the craft room!!!
22.5 Paint Little Man's New Room
22.6 Figure out furniture
22.7 Figure out bedding 
22.8 New closet organizational system
22.9 Curtains 
22.10 Sew lots and lots and lots and lots of pillows....

Guest Room / Craft Room
23. Convert guest bedroom into craft room / guest bedroom
23.1 Organize guest closet full of millions and millions of baby items
23.2 Move desk into craft room
23.3 Figure out creative storage, because I NEED IT!!!
23.4 New curtains - striped gray and white ones Never mind...
23.5 Finish craft room chair 
23.6 Refinish desk NOT DOING - WAY TOO MUCH WORK :)
23.7 Spray paint and hang some new shelves
23.8 Make some $10 ledge shelves HUNG!!
23.9 Patch up holes and touch up paint
23.10 Again figure out wall decor
24.11 Good Will donation trip from extra things in office / guest room

24. Install ceiling fan in little man's big boy room Bought, just need Grandpa to come and install it!! 

25. Paint little man's bathroom vanity - Again, MAYBE I will add this to 2013's to do list! 

Wednesday, September 5, 2012

Epic Room Makeover

I desperately need to win the Epic Room Makeover and Mandi's  help to make our living room an awesome functional room in our house!!! We have lived in our house for almost two years and its been pretty much empty the entire time.... AND of course it's the first room you see when you walk into our house, talk about embarrassing!!! I took the week off that we bought our house and the Monday I went back to work, I lost my job. Talk about stressful with a new mortgage, so it's left little in the budget for major decorating... or FURNITURE!!

The room is a blank slate for creativity!!! Look at this:
  • No window coverings what so ever!
  • A train table is pretty much the only piece of furniture in the room (not that my two year old minds that) 
  • No over head lighting makes for a pretty dark room
  • A confused lamp shade
  • Seating is two ottomans.... that were moved from the family room because someone thought they were good for jumping on

Two comfy seating options!!
For my son's birthday party (in April) I painted clouds on the wall. They are still there with gray spots and red lines..... (I thought I would paint the wall right away, so it wasn't going to be a big deal)

My big clock and entry table. But again more messed up painting!!!
One of the BIG reason's this room has stayed empty since we moved in, is that it is right next to our "Family Room"(they are connected) and so this room is the room where we have our small couch and chair, and the TV. AND MORE TOYS.... if you can't tell my son has taken over the house!!! So because of the two rooms being right next to each other, I am not sure how to decorate the first room.... a "formal" living room??? (And by formal I think only a room with out a TV :) ) Some day I would not mind tearing down more of the wall that sepeates the two rooms and making more of a single room.

Our Family Room is not without problems though..... We had friends over stay with us for the weekend and our small couch and soon to be broken chair are not enough to sit 4 people, let alone when it's just my husband and I we can't both recline and lay down for TV watching.....
Too small of a couch...... and as our main couch it's really getting abused..... AND it's a sleeper sofa.... I am tempted to be really classy and use it as a sleeper in our Family room.... classy, right?
Tears in the leather that I try and cover with a blanket.....
I REALLY need this makeover!!! I LOVE LOVE LOVE projects and know I would have tons of fun with Mandi and learn a lot from her!!!! We are hosting a Christmas party this Christmas and I would LOVE to not have an incomplete first floor this time around!!

Pluses to why I should be picked:
  1. It's a blank slate!!!! Besides the train table, there is NOTHING in this room!!! = no prep work!!!
  2. I am in desperate need to figure out what to do with this room and need the motivation to get it done!
  3. I love color and patterns and love Mandi's style and would love to learn from the best!!! AND I WANT IT IN MY LIVING ROOM!!!
  4. Without help it's going to take me at least five years to turn this into a living space
  5. I NEVER win anything and this would make my YEAR!!! 
  6. Living with two "boys" I need some alone time where I can relax... and let's face it the boys won't leave the TV so this would be my quiet space!!!!

Wednesday, May 2, 2012

My Data Dilemma

Sorry this is yet again another not a DIY post!

 I am having a dilemma with data storage and data backing up.   

A month or so ago my laptop started acting up even though it was only about a year old. It was so slow that I could not do a single thing. So after a few frustrated weeks I sent the computer off to my fabulous IT brother-in-law who gave me the annoying sad news that my hard drive was shot. Like I said my laptop was only a year old!

My BIL gave me a few options on new hard drives and I ended up going with a solid state hard drive. Traditional hard drives have moving parts, these new solid state ones do not. No moving parts = nothing to break and with a toddler who may like my laptop this is a good thing!! My old hard drive had a HUGE amount of storage (Like 500 GBs) so that meant I could store TONS and TONS and TONS of pictures from my DSLR on my computer. My new hard drive is only 128 GB which is way less space than my old hard drive already had on it... meaning I can no longer store my pictures on my laptop.

SOOOOO

I have an external hard drive and was some what diligent about backing up my data.... I had my data backed up until 2011, so I would not have really lost all that much. But lucikly my BIL was able to get my data off of my hard drive before he replaced it!!!! MORAL OF THE STORY: Back up your data!!!!! I just backed up everything onto my external hard drive. So all over 2012 is on there now as well.....

But..... I should really have a second copy of this very important data. Question for everyone how do you back up your data? I am looking at buying another external hard drive or joining the cloud :) Obviously there are pros and cons to both.

My BIL also suggested I go through my hundreds of GBs of photos and delete some of them. I mean I could easily delete half of the images... but let's be honest this will take me years!!!! I mean I can't decided between 20 of the same pictures trying to decide which one or two to keep.... (I think I need to hire an intern to delete pictures for me..... ) To give you an idea on how many pictures I have, for Little Man's first year I saved my photos by month and each month has AT least 1,200 pictures in it.

I mean how do you decide to delete even one picture from the six below.... each one is a different cute expression!!!


SOOOO

How do you decide which pictures to keep? and keep the number of pictures under control that you save?

How often do you back up your files?

How many copies do  you keep and how do you keep them?

Tuesday, April 10, 2012

I've been MIA and enjoying it!

I've been MIA and enjoying it! Last week I was enjoying a sunny, warm vacation in Arizona. We took the red eye home and got back Friday at 7 am. Saturday was Little Man's big second birthday party (where someone may or may not have gone over board....) then it was Easter and now I am enjoying catching up on sleep and relaxing! I hired a photographer for the birthday party and didn't take a single picture! So I will post the birthday party soon! Since Little Man's party was the day before Easter I did not do a single Easter / Spring project (and was very jealous of all of the cute projects out there!!!) But I did not think that Jesus and Cars mixed all that well. So maybe next year!!!! 

I found myself relieved to not have any craft projects to do today.... so we will see how long that lasts... I give it until tomorrow afternoon!!! After all I do have my sister's wedding shower this weekend so I am sure there will be some fabulous burlap projects I have to do for that!!! 

For now, a picture of the Grand Canyon! 


Thursday, March 15, 2012

Lot's to do!

Back on January 30, I posted my To Do list! And I have to say it was VERY ambitious!!

I had 9 things on my to-do list and currently have one officially crossed off. By my deadline of April 1 I should have 3.5 of the 9 done.

My little man turns 2 on April 1, so I am busy getting ready for his birthday!!!! Plus I under estimated how much time wedding invitations for my sister would take! (But they are DONE!!!!!! YEAH!!!!) and planning her wedding shower.... AND to top it all off we decided to add a surprise week long birthday trip for my dad's 60th birthday! (We told him last night, he is VERY excited!!!!)

So I have been VERY VERY VERY busy lately :) With birthday party details, wedding details and figuring out how to sanely travel with a 2 year old... (AND I AM A HORRIBLE FLYER!!! I HATE TO FLY!!) Plus I have been working on a few "fun" projects... though I am not sure a project were you take a chunk of your thumb out with a needle is fun....

So that's about how crazy things have been lately!!! But's all been fun :) and it's keeping us all busy!!

Thursday, March 8, 2012

I am on Facebook

I finally started a Decorating the Dorchester Way Facebook page!

Come on over and follow me if you like!

Wednesday, February 29, 2012

Craft Room Reveal

My craft room is done! It's been de-cluttered, organized and made pretty!

Check it out! (This is a VERY long post, just look at the pictures if you don't want to read it all!!!)
My inspiration gallery wall. Everything on this wall has some sort of meaning in our lives so I think it's the perfect start to a gallery wall! There is a picture of us and our grandparents, a frame from our rehearsal dinner, Little Man's first painting and our first house as well as other great memories!
My VERY organized closet!


I really thought out how I would use this room and how it would best work for me and my crafting. It was important to me to have all of the tools I frequently use within my reach and for them to be EASY to put away, so I could CONTINUE to be neat and organized. It was also important for me to have a place for everything and have all of those places labeled and obvious as to what they are for. I also wanted to maximize my large work space by moving my Silhouette off of my desktop so that required moving around furniture.

My craft room somehow had become a place for things we did not know what to do with and didn't really ever look at, including photo albums, wedding pictures and books. So I needed to figure out a plan for all of these things.

My craft room also needed to hold my small amount of office supplies.

How I solved my issues...

The closet - is SO organized! I have 3 plastic drawer bins in there divided up and labeled, a large drawer of paint and bins and bins and BINS of labeled organized craft supplies!! Examples of my drawers / bins are: adhesives, canvas, office supplies, wooden things, iron ons, party supplies, Silhouette Vinyl, paper, and on and on. This closet is so organized! I used wooden skirt hangers to hang some of my favorite fabric to be more visible. Neatly behind the closet door I have my large frames / canvases stacked up and on the upper shelf I have way too much pillow stuffing. I also have fabric in a bin on the floor. When I accumulate more hangers I plan to hang more fabric! To maximize space I even hung an extra shelf under the bottom closet shelf to hold more fabric.

As I was trying to figure out where to put the last few craft supply items, I had blocks and embroidery hoops and I could not figure out where to put them.... it took me 3 seconds to realize I had already made a drawer and labeled it Wooden Items.... duh, so easy to organize things when you really have a place for EVERYTHING!!! And next time I want either of those things I know exactly where they are!!
My desk! I wanted to keep the table top as clear as possible! But I also wanted to keep the tools I frequently use within my reach. A few weeks back I was at a Scrapbook store that was closing and picked up this display shelf that I spray painted black. I added ribbon "hangers" to items that I could not hang, so I could put them on my display shelf. (Don't judge my scissors collection!!!! I LOVE LOVE LOVE Fiskars Scissors :) )

I moved a black heavy duty decorative shelf from the basement to right above my desk so I could also help keep things off of the table top. The shelf is nice because it is sturdy so it can hold my pen carosole and pins, buttons, etc. It is also nice because it keeps my pins and other sharp items off the table top so its one more step my little man has to go through to get to things he should not. The shelf also allows me a space to store my sewing machine!
Then brought this IKEA shelf up from our basement (where it was pretty much empty) and moved the two book shelves that were in this spot. (One to the right of my desk, the other to Little Man's closet or Craigslist) This shelf allowed me to move my Silhouette Cameo off of my desk top. This shelf holds a few office supplies, manuals for my sewing machine and Silhouette, stencils, onesies, and a few other odds and ends - all labeled of course!

One issue I had when I started the challenge was how to deal with the non-craft things that needed to be in this room like my husband's diploma's (Because I still have not figured out a place for them? Where do other people hang theirs???) But after thinking about it I like them in the craft room. My hubby took a big leap going back to school after we were established in our lives so its a nice reminder that we really can do anything we put our minds too!!
For my larger stencils I used a Command Adhesive hook to hang behind the door! Once closed you don't even see these are there!
One of my most recent questions with organizing my craft room was ribbon storage. I found this box at Joann's (though I have seen similar boxes all over). I again got out my Command Adhesive strips (love these things!!) and attached the box directly to the wall. (Did you see how important it was for me to get things off of the desktop!!! AND have everything ACCESSIBLE!!!) It also makes a nice light weight shelf! I found these cute little turquoise "dishes" from Target and used my Silhouette to cut out vinyl labels. The awesome fabric is a pin board that I made from an old frame. The wide frame is also painted in chalk board paint!
I also made simple ribbon storage from baskets and floral wire!

I kept a few craft / photography books in my craft room! One of the other final things I had to figure out was how to store my small scraps of fabric. I had this black storage box that already had the dividers the perfect size for fabric scraps. They fit perfect. I cut small pieces of cardboard for those scraps I did not already have a card for. I decided this was also the perfect way to decide if I should keep the fabric scrap! If it is too small to fit into the fabric scrap bin it is not something I will be keeping. (We don't want a repeat of the craft hoarder, do we?)

I moved this shelf from the wall behind my desk to right to the right of my desk (within arms reach) to try and make things more accessible. And easier for me to see when I am crafting! I like the new layout much better than before! From the Target dollar aisle I found the small plastic divided bin for all of my small establishments. The black box holds fabric scraps!

Another HUGE HUGE HUGE problem I have is I start a project, and it fails, I get distracted, or I need to finish something else first... so I would have projects piled up on my table, taking away valuable crafting space and adding to my clutter problem. So I was 100% realistic and created 2 small "Current Projects" tins and one large "Current Project" tote. These are not places to throw crap but places to store projects I am working on. So in my two current project tins I have a St. Patrick's day shirt for little man and a project for his birthday. In my large plastic tote I have lots of supplies for his birthday party. To stop hoarding and procrastination, if a project has been in the "current project" bin for more than a month it needs to go!! It either needs to be finished, called a craft fail and trashed or "taken apart" and moved back into it's proper supply location! I am very happy I created these bins and know they will help to keep me organized, motivated and hopefully prevent me from doing too many projects at one time!!

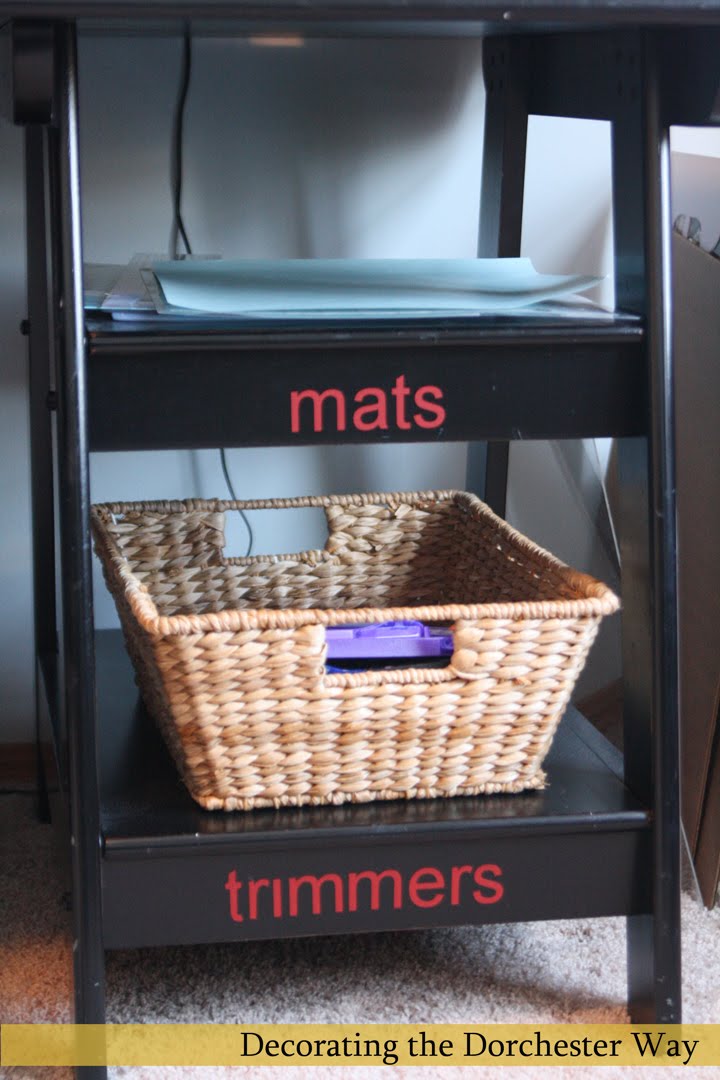
Going back to keeping the supplies I need close, I moved all of my paper trimmers to the shelf below my desk, as well as my Silhouette mats and cutting mats and my printer paper! I moved these here in the middle of the month and it is SO helpful having them so close! I can use them and put them back right away!! I also used my Silhouette to cut out some vinyl labels for the items to directly label my desk!! I am loving the red on the black!!
For now this side holds my paper and my printer!! (I won a new printer so I am waiting to see how big it is!!) The red tote to the left of the desk is my large "Current Project" tote!!!!

I did not keep a tally of how much I spent, but A LOT of this I already had. All of the frames on the wall I re-purposed except for the red mirror which was $3 from Good Will. I did hit up Target for a lot of storage items, but several were from the Dollar Aisle (some were in the $2.50 part, but still) So I would estimate my total cost right around $100.

Can you believe what this room started like? It looks like I am one step away from being on hoarders!


Here is my progress over the 29 days!

It was a lot of work and time, but I really had too much stuff in that room and once I went through and took out three huge boxes for charity it really was a good starting off point!! Once that was done it took time of organizing the things that did not belong in the room and finding a new ORGANIZED home for it!