Friday, March 18, 2016

Simple and Inexpensive Kids Monster Bathroom

Wow is my kids bathroom a difficult room to photograph!!!! (Maybe all bathrooms are tricky!!) It is a long bathroom with a pocket door between the sink area and the tub/toilet area. While I like this idea functionally, it makes photoing tricky. 

I spent a lot of time debating on if I should paint this room or not. I decided not to paint it and am very happy with my decision not to paint it. It just looks so bright and clean with the white painted walls!
I love the look of the bright and bold colored prints with the dark frames on the white walls. I love the little Monster artwork I purchased on Etsy!!! They turned out so cute and look awesome in the room! I got their initial letter hooks a year or so back and never had a place for them. So they work out great for hanging their towels!!
More monster artwork!
The inspiration on my monster themed bathroom! A Target shower curtain.
The best part of this bathroom is the extra storage!! There is enough room in the large bathroom vanity to hold all of their towels!! This was part of my spring organization on the 40 Bags in 40 Days!

Monday, March 14, 2016

Small Bathroom Reveal and Free Artwork

Wow it is hard to photograph a small bathroom!!! Especially with a dark wall and a bright window and a reflective mirror.... 

Immediately I knew that I had to paint our small main floor powder room. And it didn't take me long to make the bold move and paint the whole thing a dark navy! I am so glad I did, I love this room!!! (A side note, it too forever to paint this room navy, it took so many coats and with it being a small room with unmovable items in it, it just took a long time!!!)

I knew I would need some fabulous artwork in this room, I gave my kids paper and a couple colors of paint in the colors I wanted, and yeah instant FREE artwork!!!
Being a small powder room, there is not any storage, so I thought this Ikea shelf would not only complement the navy wall color but be a perfect small storage space!
I also didn't want a basic builder grade mirror in all of my bathrooms, so I found this pretty mirror which works perfectly with the dark navy walls!
I love my small little navy bathroom!

Saturday, March 5, 2016

Should You Paint Your Cane Chairs?

 I debated and debated. Consulted with my sister who did not paint the cane chairs she acquired. And decided YES, YES you should, or in this case, I should!!
 
 I bought the pair of cane chairs from Craig's List for $30!! They needed to be reupholstered, that was a given. The previous owners had cats and the fabric was white and nasty. The cane was ok, but they were very worn and chipped, so I decided yes I was going to paint! And I am so glad I did, they look AMAZING!

I splurged on the fabric, and purchased this fabric at $25 a yard!!!! I never spend this much on fabric, but since I only needed a little, I splurged. 
 Aren't they pretty?? I am so happy with how they turned out!!
 And for about $25 a chair, you cannot beat that!!! Take the risk, paint your cane chair!!!

Wednesday, March 2, 2016

DIY Kids Birthday Party Table

A few years back when planning my son's second birthday party, (he is soon to turn 6!!! Where did the time go????) I knew I wanted a kids table, but I didn't have one big enough for all of the kids coming to his party. After some brainstorming, I remembered I had an old hallow-core door that I had converted into a beer pong table which we for some reason never used. Well it turns out a hallow-core door turned beer pong table, makes a GREAT kids birthday party table!!! 

Can we talk about DIY awesomeness for a minute?? I HAND painted that W on the table!!! 

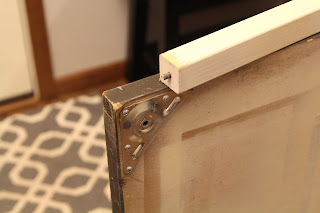
Anyways, after a trip to Home Depot, I bought 4 short screw in wooden legs and 4 corner brackets. I attached the brackets and as easy as that I had a short kids table that held LOTS of little kids!!!

The best part is this table is easy to store! Unscrew the legs, and its flat! And now that my kids are getting a little older, I can go and buy new legs that are a little taller and we still have a table!

Here are a few places I have used this table!

Friday, February 26, 2016

Simple Red Minnie Mouse Birthday Party

A couple weeks back I posted about my daughter's 3rd birthday, and realized I never shared her big 2nd Birthday Party. At the time this little girl was OBSESSED with Minnie and Mickey Mouse. So it was a VERY easy decision on what type of party she would have. But since she had an over the top PINK 1st Birthday, I decided on a red Minnie Mouse party.  I love the look of the primary colors in the red Minnie Mouse - and made for some easy party decorations!

The cupcakes were so simple. I ordered a couple dozens from Target and had them frost them in red and white.
                                                 
Mini Oreo's and little bows made some EASY Super cute Minnie Mouse cupcakes.
A few days before her party she decided she wanted a Goofy cupcake. I added little figurines to some of the cupcakes, so she got her Goofy cupcake!

As I have done for all of her birthday parties, we had a Hot Chocolate Bar. A must in February! 
I made all of the Mickey silhouettes with my Silhouette.
No party is complete without a Happy Birthday Banner! 
 The food with a Minnie Mouse Birthday party could not be any easier!!! A HOT BOG Bar of course! Check out my tips for a hot dog bar with a free printable!
Hot dog topping suggestions!
 Some simple table decor for the kids table!
And there you have a simple red Minnie Mouse Birthday Party!!! 

Wednesday, February 24, 2016

Handmade Headbands and Banner Pendants

A while back I toyed with opening an Etsy shop and putting my sewing to use. I have finally created a Facebook page for some of my sewing projects. Check out my new Facebook page: Ange Sew Simple

Sample banners!

I also created some headbands for a local photographer, so I made a few extra. These make great newborn photography props! They are adorable on!

Thanks for visiting, stop over to my Facebook page and like Ange Sew Simple for new items!

Saturday, February 20, 2016

2016 is My Year

2015 was a great year! We sold our house, lived with my parents for a few months while we built a new house, and moved into our brand new house! As you can imagine it was a crazy busy year! But it was great.

2016 is going to be my year! A year I focus on myself for once. I've already had my birthday for 2016, and I am getting so close to a crazy big number, so it's time to focus on me!


Just planning on doing a few simple things!!
1. Eat healthier
2. Move more
3. Drink more water
4. Do something for myself at least once every other week
5. Get organized

Wednesday, February 17, 2016

Organized Hall Closet

One of the last things you tackle when moving into a new house is the closets! People usually don't randomly look into them, so why bother. Well I finally tackled my upstairs hall closet. My before..... 


This is a fairly nice sized hall closet, well at least compared to the last two hall closets we have had! I showed the hall closet from our last house here. While it was much longer, it was SO shallow. You could barely put a bin in it because of it being shallow and with the supports.

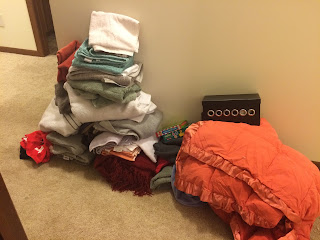
Look at all of the stuff I took out of there!! This is a massive pile of stuff we don't need. For some reason I had 25 pillow cases and about 10 unneeded and crappy bath towels! I also moved all of the kids towels into their bathroom in an empty cabinet.


And the after!!!! AHHH so much prettier and so much more organized!!! AND I have so much more space for additional organized bins and what nots!! 
 It's amazing how much prettier a space looks when its not over crowded and with pretty bins!!!


Tuesday, February 16, 2016

Industrial Laundry Room Make Over

I give you my new and fabulous Laundry Room!!! 

I am so excited about this room!!! First off, in my past two houses, our laundry room has always been way down in the unfinished part of the basement. I hated carrying big laundry baskets down two full flights of stairs just to do laundry. So when we built our house, I was so excited for our laundry room to be upstairs on the same floor as our bedrooms!!!! This has made my life so much easier!

I give you my before, this is what it looked like when we moved in. "Standard" according to the builder would have been a wire shelf across the wall, I asked the builder to not add that, which gave us a nice little credit and a blank space to work with.
 I thought and procrastinated about this space for a long time. Cabinets would have been nice, but cost money. As you may remember last year I made Industrial Shelves for our basement using galvanized pipes. I was not completely happy with how my shelves turned out, and we currently have an unfinished, chaotic basement. So I decided to tear apart my Industrial shelves and hang them up for FREE laundry room shelves!!!! (Free because I already had the stuff!!)

I was so NERVOUS about attempting this project. It would either turn out AMAZING or be a huge huge fail.
It was actually fairly simple project once I got the nerve to do it!!

I used

  • 8 floor flanges which I had previously spray painted bronze
  • 8 - 12 in pipes which I had previously spray painted bronze
  • 6 foot board which I previously stained
  • screw
  • level
  • drill and screw driver
Assembly is easy, find a stud (each floor flange has at least 2 screws into a stud) and attach the floor flange to the wall, and then screw in a pipe. Using a level repeat until you are done!!! See, so easy, why was I nervous about this project????


It is amazing how much different this room looks now!
I am so glad I tore apart my shelves that I wasn't feeling and created something I love and is VERY useful!!
 I love this photo! It was taken by my grandma :)


The laundry room is right between my kids bedrooms, so a lot of times they just throw their dirty laundry right into the washing machine!  And I love that I have a window!! It is such a fun place to do laundry, and so convenient that I do at least one load of laundry a day!!