
Check it out! (This is a VERY long post, just look at the pictures if you don't want to read it all!!!)
 My inspiration gallery wall. Everything on this wall has some sort of meaning in our lives so I think it's the perfect start to a gallery wall! There is a picture of us and our grandparents, a frame from our rehearsal dinner, Little Man's first painting and our first house as well as other great memories!
 My VERY organized closet!


My craft room somehow had become a place for things we did not know what to do with and didn't really ever look at, including photo albums, wedding pictures and books. So I needed to figure out a plan for all of these things.
My craft room also needed to hold my small amount of office supplies.
How I solved my issues...
How I solved my issues...
The closet - is SO organized! I have 3 plastic drawer bins in there divided up and labeled, a large drawer of paint and bins and bins and BINS of labeled organized craft supplies!! Examples of my drawers / bins are: adhesives, canvas, office supplies, wooden things, iron ons, party supplies, Silhouette Vinyl, paper, and on and on. This closet is so organized! I used wooden skirt hangers to hang some of my favorite fabric to be more visible. Neatly behind the closet door I have my large frames / canvases stacked up and on the upper shelf I have way too much pillow stuffing. I also have fabric in a bin on the floor. When I accumulate more hangers I plan to hang more fabric! To maximize space I even hung an extra shelf under the bottom closet shelf to hold more fabric.

 As I was trying to figure out where to put the last few craft supply items, I had blocks and embroidery hoops and I could not figure out where to put them.... it took me 3 seconds to realize I had already made a drawer and labeled it Wooden Items.... duh, so easy to organize things when you really have a place for EVERYTHING!!! And next time I want either of those things I know exactly where they are!!
 My desk! I wanted to keep the table top as clear as possible! But I also wanted to keep the tools I frequently use within my reach. A few weeks back I was at a Scrapbook store that was closing and picked up this display shelf that I spray painted black. I added ribbon "hangers" to items that I could not hang, so I could put them on my display shelf. (Don't judge my scissors collection!!!! I LOVE LOVE LOVE Fiskars Scissors :) )
I moved a black heavy duty decorative shelf from the basement to right above my desk so I could also help keep things off of the table top. The shelf is nice because it is sturdy so it can hold my pen carosole and pins, buttons, etc. It is also nice because it keeps my pins and other sharp items off the table top so its one more step my little man has to go through to get to things he should not. The shelf also allows me a space to store my sewing machine!
 Then brought this IKEA shelf up from our basement (where it was pretty much empty) and moved the two book shelves that were in this spot. (One to the right of my desk, the other to Little Man's closet or Craigslist) This shelf allowed me to move my Silhouette Cameo off of my desk top. This shelf holds a few office supplies, manuals for my sewing machine and Silhouette, stencils, onesies, and a few other odds and ends - all labeled of course!
One issue I had when I started the challenge was how to deal with the non-craft things that needed to be in this room like my husband's diploma's (Because I still have not figured out a place for them? Where do other people hang theirs???) But after thinking about it I like them in the craft room. My hubby took a big leap going back to school after we were established in our lives so its a nice reminder that we really can do anything we put our minds too!!

For my larger stencils I used a Command Adhesive hook to hang behind the door! Once closed you don't even see these are there!
 One of my most recent questions with organizing my craft room was ribbon storage. I found this box at Joann's (though I have seen similar boxes all over). I again got out my Command Adhesive strips (love these things!!) and attached the box directly to the wall. (Did you see how important it was for me to get things off of the desktop!!! AND have everything ACCESSIBLE!!!) It also makes a nice light weight shelf! I found these cute little turquoise "dishes" from Target and used my Silhouette to cut out vinyl labels. The awesome fabric is a pin board that I made from an old frame. The wide frame is also painted in chalk board paint!
 I also made simple ribbon storage from baskets and floral wire!
 I kept a few craft / photography books in my craft room!
  One of the other final things I had to figure out was how to store my small scraps of fabric. I had this black storage box that already had the dividers the perfect size for fabric scraps. They fit perfect. I cut small pieces of cardboard for those scraps I did not already have a card for. I decided this was also the perfect way to decide if I should keep the fabric scrap! If it is too small to fit into the fabric scrap bin it is not something I will be keeping. (We don't want a repeat of the craft hoarder, do we?)
 I moved this shelf from the wall behind my desk to right to the right of my desk (within arms reach) to try and make things more accessible. And easier for me to see when I am crafting! I like the new layout much better than before! From the Target dollar aisle I found the small plastic divided bin for all of my small establishments. The black box holds fabric scraps!
Another HUGE HUGE HUGE problem I have is I start a project, and it fails, I get distracted, or I need to finish something else first... so I would have projects piled up on my table, taking away valuable crafting space and adding to my clutter problem. So I was 100% realistic and created 2 small "Current Projects" tins and one large "Current Project" tote. These are not places to throw crap but places to store projects I am working on. So in my two current project tins I have a St. Patrick's day shirt for little man and a project for his birthday. In my large plastic tote I have lots of supplies for his birthday party. To stop hoarding and procrastination, if a project has been in the "current project" bin for more than a month it needs to go!! It either needs to be finished, called a craft fail and trashed or "taken apart" and moved back into it's proper supply location! I am very happy I created these bins and know they will help to keep me organized, motivated and hopefully prevent me from doing too many projects at one time!!
 Going back to keeping the supplies I need close, I moved all of my paper trimmers to the shelf below my desk, as well as my Silhouette mats and cutting mats and my printer paper! I moved these here in the middle of the month and it is SO helpful having them so close! I can use them and put them back right away!! I also used my Silhouette to cut out some vinyl labels for the items to directly label my desk!! I am loving the red on the black!!
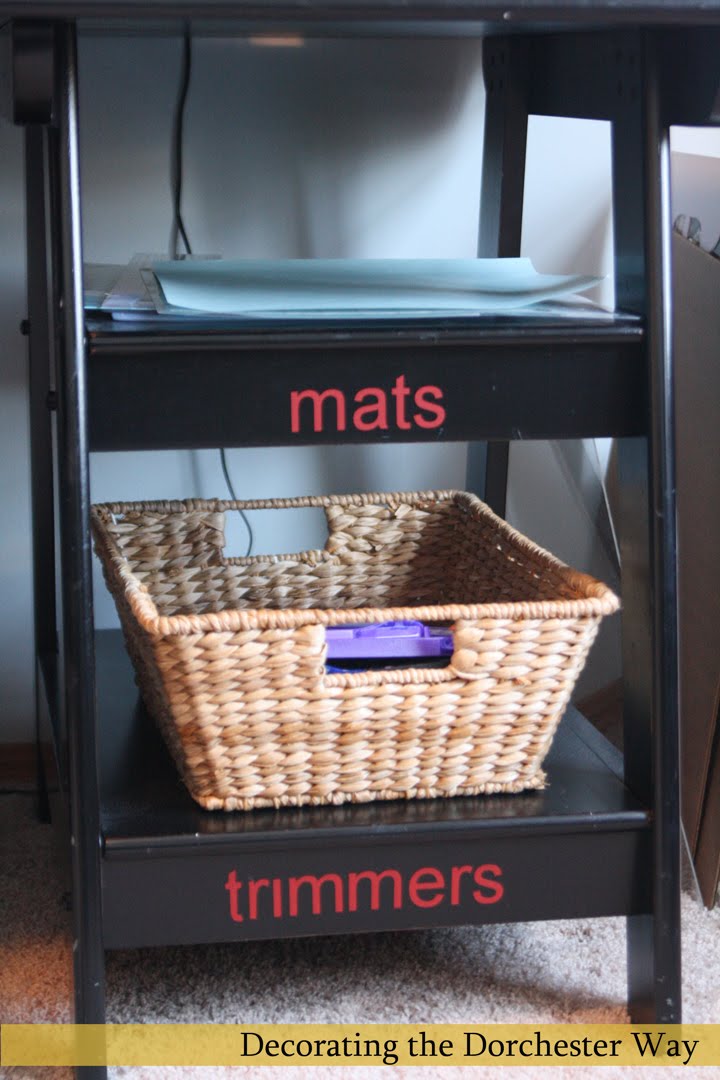 For now this side holds my paper and my printer!! (I won a new printer so I am waiting to see how big it is!!) The red tote to the left of the desk is my large "Current Project" tote!!!!
I did not keep a tally of how much I spent, but A LOT of this I already had. All of the frames on the wall I re-purposed except for the red mirror which was $3 from Good Will. I did hit up Target for a lot of storage items, but several were from the Dollar Aisle (some were in the $2.50 part, but still) So I would estimate my total cost right around $100.
Can you believe what this room started like? It looks like I am one step away from being on hoarders!


Here is my progress over the 29 days!
It was a lot of work and time, but I really had too much stuff in that room and once I went through and took out three huge boxes for charity it really was a good starting off point!! Once that was done it took time of organizing the things that did not belong in the room and finding a new ORGANIZED home for it!
Congratulations! I could NOT believe my eyes when I saw the before pictures. You worked hard! Well done. It's a gorgeous room--functional, too. Love all the labelling.
ReplyDeleteI know I was a step away from being on Hoarders!! Thanks for the nice comments!!
DeleteGreat job it looks awesome
ReplyDeleteThank you! I am so happy with it!
DeleteWOW! Congratulations, that is awesome!
ReplyDeleteLove all your decor and organizing tools!
Thank you so much!! It was a lot of work but its so nice to have an organized space!!
DeleteWOW!! What a transformation! Well worth the hard work I say
ReplyDeleteThank you for the comment. It was 1000% worth the work!! AND it's STILL organized!!! Even after a few projects!!
DeleteThe decor is great, and I adore that black cabinet with the blue bowls and black baskets. The colors in your room are great.
ReplyDeleteThank you!! I know I am in love with these colors!!
DeletePat yourself on the back my dear, your room is so great. Functional and yet so darn adorable. Great job.
ReplyDeleteThank you so much! I love my room!
DeleteOMG I love it !! just love it!!!!
ReplyDeleteThank you so much!! I am still loving my room!!!
Deletea very sophisticated look to a room with wonderful potential for creating and crafting. Good for you!
ReplyDeleteIt really is so much easier to be creative in a space that is clean and organized and clutter free!! Thanks for the comment!
DeleteYou really came a long way! I love the labels you used for everything. So neat and clean!
ReplyDeleteBecause of this project I am obsessed with my label maker!! Thanks for the comment!
DeleteWow, I love it. Great Job! Just joining the bloglovin blog hop, and now following you! Please hop over, say hi, and follow me at
ReplyDeletewww.emmalinebags.blogspot.com
Thanks for the comment and the follow! I just checked out your blog and followed you as well! Thanks for the comment!!
DeleteWow! What a great before and after! It's so much more fun to craft in a room that is customized to you and is completely organized. Here is a little tip for your very smart "Current Projects" bins. Pin or tape a little note on each project as you place it in the bin- include the date and your next step. This will help you be more accountable to your one month goal and will save you a little thinking as far as "what do I next?". Great job!
ReplyDeleteThanks for the great comment! That's a great idea for my current project bins. Thanks for the suggestions! I think thats a great idea!
Deletelovely new space - i'm....well...jealous! very nice! fresh new linky party just opened - would love to have ya come play if you'd like!
ReplyDeletewww.NorthernCottage.net
I linked up. thanks for the comment!
DeleteSuch a beautiful space, I love all the color choices. Your newest follower.
ReplyDeleteLisa
Creative Raisins
Thank you for your nice comment and thanks for the follow!!! I appreciate it!!!
Deleteahhhhhhh i love every single thing about this room. all the different organization items have my heart going pitter patter. this room looks awesome! it makes me want to go home right now and work on my own craft room......maybe i will!
ReplyDeletestopping by from turquoise tuesday
hope you'll check out my blog.
mybagofsunshine.blogspot
Thanks for the sweet comment!!! I appreciate it!
DeleteThis craft room is beautiful! I love how you used your vertical space and maximized your storage. Love the color scheme and clever containers.
ReplyDeleteThank you so much! I spent a lot of time thinking out how to use my space to the maximum! I really appreciate your comment!
Deleteoh my goodness! That is amazing! LOVE your makeover :)
ReplyDeletehttp://fitcraftystylishandhappy.blogspot.com/
Thank you so much!! I am so proud of my room and glad its done!!
DeleteWhat a beautiful and fun craft room! Someday I hope to have one of my own. Thanks for sharing! :)
ReplyDeleteThank you so much!! It was a lot of work, but SO worth it!!
DeleteYou are SO organized I love it! Also love the color pallette used in your craft room! GREAT JOB!
ReplyDeleteBarbara
http://chase-thestar.blogspot.com/
Thank you so much! I am sooooo happy with my room!!
DeleteI love all the colors and pops of pattern! And that closet is so organized. I'm really very impressed! Thanks for sharing at oopsey daisy!
ReplyDeleteThank you so much!! I really love my super organized closet!! It's so easy to craft now!!
DeleteSeriously unreal!! I was feeling really bad about myself until I saw the bottom photos...maybe there is hope for me!! I am soooo impressed, that is some wicked organization going on!! Fabulous! thanks you for sharing at Uncommon! Bonnie ;)
ReplyDeleteThank you so much! It did take me a lot of time to get it to be so organized, but I LOVE it now!!!And it's so much easier to get projects done now!!
DeleteGreat job! I dream about being that organized!!!
ReplyDeleteThank you!! You can do it, it just takes time!!
DeleteAWESOME!!! It looks wonderful!
ReplyDeleteWonderful craft room, it was worth all the pain! I love the art wall a lot (it's got everything, right?) and the ribbon storage. Visiting from Tutus and Tea Parties (my link is http://meehameeha.blogspot.com/2012/03/how-to-make-spring-vignette-in-5.html).
ReplyDeleteI really love your wall of photos and decorations!!! Your craft room is very functional and well put together:)
ReplyDeleteI love your style. This room is gorgeous. Way better before pictures than mine. The before pictures of my craft room tells a story of a craft hoarder lol. I had all sorts of random potential craft junk that I've collected in hopes of creating unique fun crafts with my children. Cans, toilet paper tubes, kid art that I kept swearing I'd go through, etc. I finally got rid of most of that "craft" stuff and got it all sorted out but my ADD hasn't allowed me to finish before moving on to the other rooms. It's probably the new house bug. Anyway, this has definitely given me motivation to finish my craft room...tomorrow :)
ReplyDeletelove this transformation! just came over from midwest bloggers:) and it looks like I tipped your google followers to 100! Yay! That was fun:). can't wait to see what else you have in store. i'll have to look at your shelves, but now i need to make sure the kids are in bed. check back soon...
ReplyDeleteWhere is your desk from?
ReplyDeleteWhere is your desk from?
ReplyDeleteI got it maybe 5 years ago from Target! Its a great huge desk!! I am not sure if they still have it, but maybe online?
DeleteIt is my great pleasure to visit your website and to enjoy your great post here. I like it very much. I know that you put much attention for these articles, as all of them make sense and are very useful
ReplyDeleteUpholstery
Where did you get your desk? I absolutely love the look you created!
ReplyDelete