My top 2012 posts are as follows:
DIY Burlap Wedding Shower Invite
Red Envelope Knock-off Artwork
Craft Room Reveal
Chevron Curtains
And my most popular post of 2012 is my DIY Pouf
I can't wait to share my projects in 2013! Happy 2013 to everyone and thanks for reading!!
Showing posts with label canvas. Show all posts
Showing posts with label canvas. Show all posts
Wednesday, January 2, 2013
Monday, May 21, 2012
My Gallery Wall
So I finally finished my Master Bedroom Gallery Wall. It has been done for a while - well mostly - and I finally got around to posting it.
I am happy with what it looks like so far. I am sure at some point I will add to it, but for now it's a great start. And most importantly it's adding something fun to our pretty boring master bedroom.
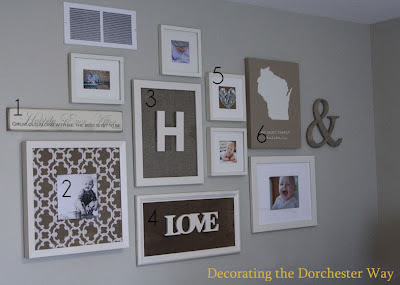
Below is a run down on some of the pieces included in the gallery wall,
1. Is a plaque we got as a wedding present almost 7 years ago! It fit perfect with my wall.
2. I spray painted this Red Envelope larger frame that was originally meant for a shadow box. I created a mat for the frame by using foam board and a shower curtain to create an 8x10 opening.
3. A burlap background with a big H!
4. This is my favorite. I spray painted the frame and used leather from a leather skirt I wore the day my husband proposed to me as the background. I loved the skirt at the time but it is no were near close to something that will fit me so this is the perfect way to see it and remember that special day!
5. I created a heart out of buttons onto cardboard. The buttons are shinny and add nice dimension to the gallery wall.
6. I made myself some state artwork that I previously made based on the Red Envelope state art
I really like my button heart. I also really like that I could include the skirt I wore when I got engaged! I love the meaning it adds to our room.
The entire gallery wall was put together using Command Adhesive. I LOVE this stuff! It works great for a gallery wall like this because it can easily be changed in the future without having lots of holes to repair.
Friday, April 20, 2012
Burlap Wedding Shower
Last weekend we hosted my sister's wedding shower. Since my sister wanted a joint shower with both sides of her future family we decided to have it at a restaurant! After the insane April we have had, it was a great decision! My youngest sister put together this cute towel wedding cake display for our sister. We used burlap circles to decorate the "cake" and a rhinestone hair pin on the top for a little extra bling.
Since we used burlap on the invites (and I am sort of obsessed with it at the moment) I made a burlap banner. ( I wish I would have hung this a bit higher, but oh well it still looks cute!!)
This was so simple to make. I simply cut out 4 - 5.5 x 5 inch burlap squares. I then made a stencil with my Silhouette (you could easily buy something, or free hand if you like) and used my trusty black acrylic paint to fill in my stencil. Once dried I used my sewing machine to sew the squares together onto a piece of jute. So simple and so cute!!!
Then I made the Bride and Groom initial canvas artwork for them to use as they wish! I found these great linen canvases at a local craft store. I LOVE the color and love how they are not white but already have that great linen texture!! (I bought 4 more for myself for TBD projects!!! I love them THAT much!!!)
I again used my Silhouette to create a stencil for the letters. (Again you could use other options to achieve this looks!) Again used my acrylic black paint (that's what the label said!!) and created this cute simple artwork!
The last project I created for this shower was the favor. You can't have a shower without a favor!!! I ran to Home Depot and picked up a few packages of Gladiolas bulbs. We then cut and wrapped them in burlap. (See how to cut burlap) I used a stamp set to stamp the phrase "Let love grow" onto a piece of card stock and included basic planting directions (we didn't want anyone to think it was something to eat.....) and there we have a simple but cute favor to match our burlap themed wedding shower!
The best part about using Gladiolas bulbs is this was my grandpa's favorite flowers. He used to grow these flowers and they really remind me of him!
The whole look!!!
Since we used burlap on the invites (and I am sort of obsessed with it at the moment) I made a burlap banner. ( I wish I would have hung this a bit higher, but oh well it still looks cute!!)
This was so simple to make. I simply cut out 4 - 5.5 x 5 inch burlap squares. I then made a stencil with my Silhouette (you could easily buy something, or free hand if you like) and used my trusty black acrylic paint to fill in my stencil. Once dried I used my sewing machine to sew the squares together onto a piece of jute. So simple and so cute!!!
Then I made the Bride and Groom initial canvas artwork for them to use as they wish! I found these great linen canvases at a local craft store. I LOVE the color and love how they are not white but already have that great linen texture!! (I bought 4 more for myself for TBD projects!!! I love them THAT much!!!)
I again used my Silhouette to create a stencil for the letters. (Again you could use other options to achieve this looks!) Again used my acrylic black paint (that's what the label said!!) and created this cute simple artwork!
The best part about using Gladiolas bulbs is this was my grandpa's favorite flowers. He used to grow these flowers and they really remind me of him!
The whole look!!!
Labels:
art work,
burlap,
canvas,
diy,
gifts,
homemade,
party,
party decor,
silhouette,
stencil,
wedding,
wedding shower
Monday, February 20, 2012
Large Alphabet Wall Art

After re-arranging my little man's nursery I had a very large blank wall so I created some large scale alphabet wall art!
This huge 36 x36 inch canvas that I painted for our first house while I love the colors, does not really fit into the colors of any room in our new house. And since this is a huge canvas I wanted to re-use it! I repainted the whole thing the same dark chocolate color for my new project.
I designed my "design"out in InDesign first before creating the letters in the Silhouette Studio software. I ended up using Arial Bold font size 530pt (so the letters were HUGE)
I then went used way too much vinyl to make this! Luckily I scored 2 rolls of pink vinyl when my favorite local craft store was going out of business for $2.30 a roll, because I used one whole roll and at least half of the second. I tried using contact paper but that's a whole other issue :)
I will admit it was not easy to transfer the vinyl to my canvas because I was working with such large pieces. I found it did help to cut the row in half and work with smaller pieces. Also going back to my being a craft hoarder I saved all of the inside pieces of my vinyl alphabet for a later to be determined project!! The key to laying the vinyl is to GO SLOW and BE PATIENT!!!

To prevent bleeding I then painted with my original bottom color and let it dry!

Then I gave the letters a coat of my Behr Color matched Restoration Hardware Baby Silver Sage Paint.

Since I was pulling up such huge pieces of vinyl I let it dry longer than I normally would. I didn't want to pull up the vinyl with wet paint still on it and have it accidentally land on the print and ruin it!! I also did have to do some touching up on the letters.
Here is the finished product and it nicely shows the size of this canvas!!


Tuesday, January 17, 2012
Knock Off Decor
I am so excited that I have been featured on Knock Off Decor for the SECOND time!!
Thanks again Knock Off Decor!

I love this site and am so happy to be featured on it! Check it out, so many fabulous knock offs!

 In November my Dr. Seuss Bathroom was featured. This bathroom was a lot of work - and I actually painted those fish! But I am so proud of this bathroom and Little Man still loves pointing out all of the fish each time he takes a bath!

 In November my Dr. Seuss Bathroom was featured. This bathroom was a lot of work - and I actually painted those fish! But I am so proud of this bathroom and Little Man still loves pointing out all of the fish each time he takes a bath!
Thanks again Knock Off Decor!
Friday, January 13, 2012
Red Envelope Knock-off Artwork
I love Red Envelope for their unique gifts. I have bought and received my share of things from Red Envelope but recently when exploring their website I came across their personalized canvas art work starting at $120. While I would have no problem purchasing a personalized canvas for that price but these are SO simple looking that I figured I could easily make them myself for a fraction of the price.
I LOVED the state canvas! So cool! But so easy to make! (For some reason this was really hard to photograph - the state looks pink.... it's not, it's white!!!)
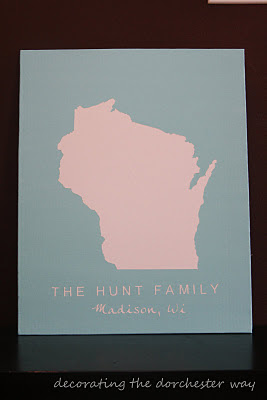 I used my Silhouette Cameo to make state of Wisconsin and the text.
I searched the internet for a state of Wisconsin image and I found a pretty simple one. If you can't find a simple shape you can use the directions I used for making a silhouette of my son in photoshop.
To cut the state shape with the Silhouette, I saved my image as a JPG and opened it in Silhouette studio. In the trace menu I selected my entire image with the "select trace area" and then selected "trace outer edge." I then re-sized mine to be about 12x12 since I was using a 16x20inch canvas. Then it was off to the cutting machine!

I then transferred the state and words to the canvas.

I then piled on the white paint to try and seal the vinyl to the canvas. I actually did two light coats and it did NOT bled.

I then painted several layers of Martha Stewart's Surf craft paint.

I did let it dry over night so it was good and dry. I know some remove the vinyl when wet, but I figured it would be easier to remove the large state image when dry since its so large! I was so nervous pealing the letters off!

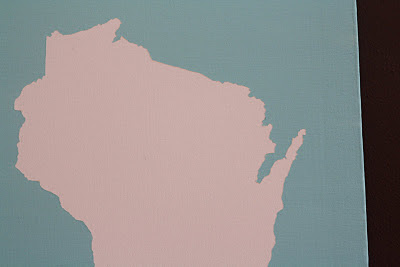
But it turned out GREAT! I love it! I love the detail that the Silhouette cut out for the state border!
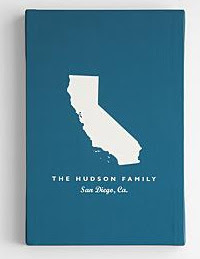
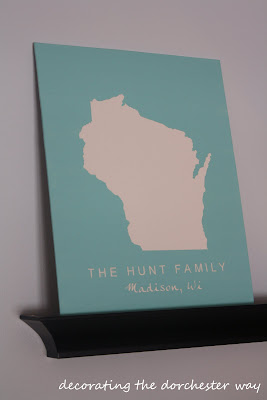 I think it turned out great! Here is the original from Red Envelope for $120!
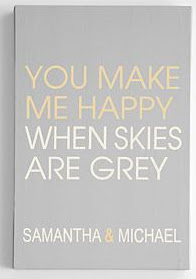
 While browsing the Red Envelope site I came across this pretty canvas that will go well in my guest bedroom! Again $120!
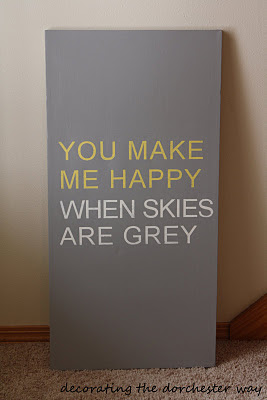
 Well here is my version. So simple I just used my Silhouette again. And this canvas I have had for about 5 years and re-painted over it the dark gray not knowing what I would use it for! So this was a pretty near free project for me! This canvas is about 15x30 inches and I love how large the canvas is and how there is so much extra space on the top and bottom!


I then piled on the white paint to try and seal the vinyl to the canvas. I actually did two light coats and it did NOT bled.


 I think it turned out great! Here is the original from Red Envelope for $120!
 While browsing the Red Envelope site I came across this pretty canvas that will go well in my guest bedroom! Again $120!
 Well here is my version. So simple I just used my Silhouette again. And this canvas I have had for about 5 years and re-painted over it the dark gray not knowing what I would use it for! So this was a pretty near free project for me! This canvas is about 15x30 inches and I love how large the canvas is and how there is so much extra space on the top and bottom!
Labels:
art work,
canvas,
Knock Off,
Red Envelope,
silhouette,
stencil
Sunday, December 18, 2011
My first Silhouette Project!!!

Last week I promised my finished first silhouette project. It was so much more difficult than I thought it would be. I follow lots of bloggers who frequently post about their Silhouette so I thought it would be easy and fast to use. While I do still really like my Cameo, it just is a lot harder to use than I thoguht it would be!
So I cut on vinly the saying "Have yourself a merry little Christmas" to paint onto a canvas board. This part was the most fustrating part, but I finally was able to cut the saying out of a couple cutting sessions...
I transfered the vinyl onto the transfer paper. This part seemed easy enough...

And the vinyl did stay attached to the transfer paper!

Rubbing it back onto my surface was a bit harder than I thought it would be. I had to use the tool to hold the vinyl onto the canvas board to get it to stay down as I pulled the transfer paper back.

After the very slow process, I was finally able to align all of the letters onto the canvas board. It looks so pretty like this, I maybe should have just left it like this!!

I made two copies of this canvas. The second time I used the white back ground paint to paint over the letters first to try and take care of any seepage... it didn't help.... and actally worked better on my first version... of well! I used Martha Stewart paints and the sponge brush.

Loving the first part of the canvas!

Onto the second part!

Red glitter paint for the word "little" from the Martha Stewart line. The glitter paint was a little hard to paint over the green paint, but the sponge seemed to help, and after 3 coats we had a nice finished product.

The finished product!! I am very happy with how it turned out! I thought it would be easier than it really was, but I can't wait for my next project.

Subscribe to:
Posts (Atom)


